Kids love crafts, that’s no lie. And kids love giving things that they have made to people they love. This Mother’s Day, let your child express their love and appreciation for mom (or grandma!) and be entertained with these simple homemade mother day crafts! Pull out your paper, grab your glue sticks, and get ready! We’re about to have some crafting fun!
Pop-up Heart Cards
A simple, easy, and most importantly, mess-free craft! Making a DIY Mother’s Day card is fun, fast, and beautifully sweet. All you’ll need to do is round up some construction paper, scissors, stapler, and a glue stick.
Start by folding the paper in half like a card. Cut out several hearts, all the same size. Crease the middle of the heart by folding it in half. Then lay the hearts all flat on top of each other, and staple in the middle of the crease. Apply glue to the bottom of the hearts and to the center of the card.
Close it, then open it and watch as a 3D paper heart greets you! Decorate the card with crayons or markers, add a personal note and Volia’, a Happy Mother’s Day card!
Paper Bouquet
A flower bouquet that doesn’t wilt and die? Yes! Paper bouquet flowers are just as beautiful– and fun to make– as the real deal, and they last a whole lot longer. For this craft, all you need is a variety of muffin cups or tissue paper, and pipe cleaners!
First, you layer several muffin cups (or tissue paper, if that is what you have on hand) on top of each other. Try to do lay them biggest to smallest, and flair a few out! Customize your bouquet by coloring, or cutting to add tassels to the flower. Puncture a small in the middle with a pencil and then take a pipe cleaner, twisting it while pinching to support the cups, about an inch from the top. Weave the top through the muffin cups, and secure it by folding the top over twice.
Now put the flowers in a vase and watch the receivers face light up!
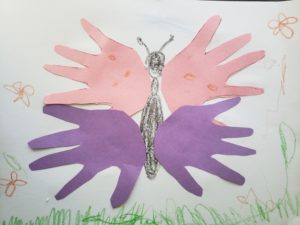
Hand Butterflies
 A fun and personal craft, hand butterflies are a great keepsake and an easy Mother’s Day craft! You’ll need construction paper, crayons, glue, and scissors.
Begin by tracing out the child’s splayed hands on a piece of paper. Don’t worry about placement just yet. Place a second piece of paper under the first and cut out the traced hands so you have four total hands now. Draw out the body of the butterfly (the middle oval part) and glue the hands as wings, placing the cutout hands slightly overlapping to make the butterfly wings. Cut out circles of paper to glue to the hand-wings, adding decoration and pattern to the butterfly. Ask the child to color in the scenery, and you’re done! A beautiful keepsake that any mom or grandma would love! If you have a laminator, consider laminating the picture so it lasts through the years.


